Pilates Equipment: What is the Wunda Chair?
- Jan 20, 2022
- 7 min read
Today we are going to chat about one of the common pieces of apparatus (or equipment), how it works, and the safety aspects!
See my Reformer post where I talk about "Why did Joseph Pilates create the different apparatus?" Pilates Equipment - What is a Pilates Reformer?
I also created another Pilates Equipment post called What are the Cadillac, Tower, and Springboard?
Now on to today's Pilates Apparatus...
Picture below showing Horseback on a Balanced Body Centerline Chair.

Pilates Chair: The Compact Apparatus!
The Wunda Chair was created by Joseph Pilates as the first home apparatus back in the mid 1940's. Since Pilates studio was located in New York City and apartment space was at a premium, the Wunda Chair became a way to incorporate movement with every day life. The Wunda Chair was designed to be a workout apparatus and a chair for every day sitting.
I have been IN LOVE with this archival video since I first saw it! It shows the conversion of what you THINK is an ordinary chair into the Wunda Chair!!! I liken it to a commercial for the Wunda Chair back in the day. Isn't that video amazing?!
I have heard a story, and I can't confirm whether it was true or not (though I want it to be true), so don't quote me. Joseph Pilates would close his studio down for a month or two in the summer due to the heat and he made his clients purchase a Wunda Chair and would give them a list of exercises to do during the studio shutdown. And upon return to the studio, Joseph Pilates would KNOW if his clients had or had not done what he prescribed.
Here's what I love about the story:
It's proof that Joseph Pilates was one smart (and tough) cookie
His clients did what he said because they knew it would help them with their everyday lives
I can just imagine Joseph Pilates one-eyeing those who had not done the work (eek!)
He made sure that his clients could do the exercises on their own.
This is HUGE! He made them independent and then told them to go do the work on their own during the summer. And his clients kept coming back, even when they were independent, because they knew there was more to learn.
Since the Wunda Chair was created, there have been many variations of a Pilates Chair on the market → so let's go over those!
The Basics - Types of Chairs:
Wunda Chair
The Wunda Chair is considered the original design used by New York City clients.
The Wunda Chair was an extraordinary design that could be used as a mat (top of Chair) or small apparatus, and then easily converted into a sitting Chair with cushions.
Most Wunda Chairs are built to Joseph Pilates original specifications and now have options for handles and high back.
Split Pedal Chair
The Split Pedal is held together with a dowel so the pedal is one piece. When the dowel is removed, each pedal can be used independently.
Some manufacturers have added kits for resistance band work on the Split Pedal Chair.
High Back Chair
The High Back system is an option created to provide more support and safety.
The back of the Chair provides alignment and support.
The cushion provides height for range.
When the cushion is removed, the foot guides can be used for different exercises.
"Chair"
Any type of Pilates Chair that isn’t classified as a Wunda Chair, Split Pedal, or High Back.
Typically, this type of Chair is one that does not support handles or band accessories available.
Chair Accessories:
Handles - typically standard on a Wunda or High Back Chair
If Handles aren't available, I recommend using a Gondola Pole as a replacement for some exercises
Pedal Stopper - purchased separately to limit the range of the pedal
Resistance Bands - only offered on certain types of Chair
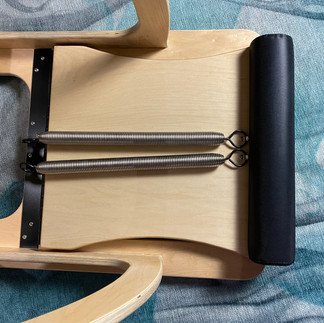
Picture below showing what I would consider a "Chair" - it is not a Wunda or a Split Pedal, and it doesn't have a High Back option. This is the Balanced Body Centerline Chair.

The Springs:
A Chair has Black Trapeze Springs
Black Trapeze Springs are the heaviest springs and each Chair will have two (2) black springs that can be adjusted from one low (1L) spring to two high (2H) springs.
The springs will seem less complex than Reformer springs, but each Chair has two spring trees with four (4) spring locations on each spring tree = eight (8) spring locations.
Most Chairs have either a middle located double spring tree called a cactus spring tree or they have two side single spring trees located on each side of the chair [see pictures below].
With the ability to combine spring locations or use a single spring, there are over a dozen options for spring tension.
About Spring Tension:
Too heavy, pending the exercise, could cause strain for compression → see your teacher for more information or concerns for each exercise
Too heavy, pending the exercise, could also cause you to fall out of an exercise because you have too much oomph! (technical term) → see your teacher for more information or concerns for each exercise
Too light, pending the exercise, could cause some imbalance → see your teacher for more information or concerns for each exercise
Picture below is showing the springs detached from the spring tree. You can see the black ring of the spring indicating that heavy black spring. The last picture is showing what is called a double spring tree or a cactus spring tree.


General Safety & Awareness
The standard Chair has a small footprint or small surface area. Most dangers relate to falling out of position on the Chair, the Chair moving during an exercise, or the spring tension settings. There are always safety concerns associated with physical movement. The safety below is not all inclusive - it is extremely general and not exercise specific. I highly recommend working with a Pilates Teacher until you understand all the safety concerns with each exercise.
Basic Safety Points:
Getting on the Chair; Getting off the Chair
Body position on the Chair → due to the small surface area
The spring not being fully attached to the spring tree
The Chair moving during an exercise
Pressing the pedal on a finger, hand, toe, or foot by accident
Lifting the pedal to bring it to the Home position
When seated on the Chair, lifting the pedal to the Home position could cause you to roll backward off the Chair
Try to keep core engagement and a tall spine.
Holding onto the Chair handles is always a good option, if you have them
Placing the Chair against a wall, so the wall is behind you, is a good option
The High Chair is the safest of all seated options
Loading the springs to help with an exercise [such as Upside Down Push up or Up and Down] can cause some imbalance or it may be "too much help" and cause you to fall out of the exercise.
Balance → a lot of exercise require some extra balance. If the Chair does not have handles it is best to have a Gondola pole (or 2) handy to help. We've have also butted the Chair up against a Tower or Pole system to use the poles for balance help.
Video below showing Upside Down Push Up. Note: The position of the Chair is close to a wall to keep exercise position and to prevent falling over the front of the Chair.
Session Planning & Expectations
*For teachers or trainees or anyone interested in session thought processes
Just like the Cadillac, the Chair has no order of exercises. The exercises are meant to help us learn the mat work, along with bringing us back to uniform development. Essentially, we use these exercises to help us where we need the help - either in mat work or in life. Since there is no order, a teacher can teach whatever they want in any order they want.
My Thought Process:
Teach the client the safety aspects of the Chair, how to change a spring, and how to test the pedal after each spring change.
Teach exercises in parts, then build on each exercise while relating them to other exercises they already know.
Consider what the exercise is teaching the client or how the exercise might help the client in every day life. Example: If your client wants to work on balance, so they don't fall on ice → you can incorporate more balance challenging exercises (safely).
My Basic Guidelines for Teaching Chair:
Try to create a flow and work in small segments
Think about all the exercises that are seated vs standing vs lying prone. Then think of how to incorporate multiple seated exercises together or multiple standing exercises together.
Easy transitions help clients keep the work going from one exercise to the next
Example Flow: Going from Footwork to Pumping to Pumping-1 leg to a seated High Frog variation has been a fun way to start recent workouts
Add some Mat to the flow! Or even a different apparatus!
Example: When doing Standing Pumping → PAUSE → Press the pedal down to the floor → HOLD → add Spine Twist
Example: After doing The Hundred → go straight into the Stomach Series for a nice beginning burner!
Example: When doing Upside Down Push Up Side → change your foot and hand position to be more like Snake on the Reformer and practice lifting from your center [see example at the end of the blog].
Mix up the order you teach while trying to maintain good flow
To Be Noted: It may be easier for beginners to get to know the exercises if you create your own order and stick to it for that client.
You can always add a prop to your beginner flow to mix it up a bit without creating confusion
Go off-book
Use archival variations or create your own variation if a client needs something in their body
Round back to the Fundamentals
All exercises start in our center and move out, but you can use the Pilates Fundamentals to find more work in each exercise.
ALWAYS KNOW: IT'S OKAY TO PLAY!
Pictures and Video below showing Mat Twist II, Reformer Snake, & a Snake variation on Chair being adapted from Upside Down Push Up Side [FUN!]


Comments